Discover how to sharpen aviation snips and improve your metalworking experience by mastering the art of precision. Unleash their true cutting potential with my step-by-step guide and achieve flawless results.

From choosing the right sharpening stone to maintaining the perfect angle For, my specialized advice will ensure safety and efficiency. Don’t settle for a dull blade that gets in the way of your work—follow my instructions to sharpen like a pro and experience the transformative power of precision metalworking.
What Causes Aviation Snips to Blunt?
Typically, aviation snips can cut sheets up to 1.2mm (0.05 inch) thickness or 18 gauge, based on the toughest metal they handle, usually mild steel. For more rigid materials, the thickness must decrease. They’re designed for cutting sheet metal using a scissor-like action with compound leverage.
They’re categorized by color: yellow for straight cuts, red for left curves, and green for right angles. Blades have serrations for grip and provide clean cuts. However, one common cause of blunting is using aviation snips on the wrong materials.
Describe 3 Methods to Sharpen Aviation Snips
Below I describe 3 methods to sharpen aviation snips that have proven very effective on many recharges; I explain how you can do the job in three ways. Let’s get started, then.
Method 1 – Sharpening Aviation Snips Using Hand Files
Step 1: Preparation
Aviation snip sharpening using hand files involves a simple but effective process that ensures precise metal cutting. Begin by gently opening the joint space of the snips using a screwdriver or wrench. This action provides convenient access to snip blades for sharpening purposes.
Step 2: Set Up for Sharpening
To carry out the sharpening process, you will need a stable work surface, such as a workbench or table, to safely work with the snips. Widen the jaws of the snips and carefully place them on the selected work surface.
Before you start sharpening, cleaning the dirt and metal debris accumulated on the blades is essential. Use a cleaning brush to clean the blades thoroughly, ensuring optimal sharpness.
Step 3: Start Sharpening
With your setup ready, it’s time to start sharpening the snip blades. Start by marking one side of the blade you want to sharpen first. Hold the hand file securely and place it along the blade’s edge.

Start your sharp strokes from the base of the blade and gradually move toward the tip. Maintaining a consistent angle throughout this process and avoiding applying excessive pressure is essential.
Step 4: Assess Sharpness
After you sharpen the first blade, please take a moment to assess its sharpness. Carefully inspect the blade’s tip, so wrap a discarded cloth around your hand.
A properly sharpened blade should exhibit a smooth and polished edge, indicating that the sharpening process has effectively enhanced the cutting performance of the snips.
Step 5: Repeat for the Other Blade
Move your attention to the other blade of the snips. Apply the same sharpening technique you used for the first blade. Ensure both edges get equal attention and maintain the same sharpness level.
Step 6: Use Lubrication
Before completing the sharpening process, it is essential to perform lubrication. Reconnect the snip nuts and screws, making sure they are securely fastened. Apply a small amount of lubricating oil to the joint between the sharp blades. To distribute the oil evenly throughout the snip, use a cloth to spread it over the area carefully.
Step 7: Test It
Now that your aviation snips are sharpened and lubricated, it’s time to test them. Choose a piece of sheet metal or similar material and try a cut. This practical test will allow you to evaluate the effectiveness of the sharpening process, helping you measure the accuracy and performance improvements achieved.
Following these steps, you can quickly sharpen your plane snips using hand files.
Method 2 – Sharpen With Dremel Tools With a Sharpening Kit
When precise metal cutting is required, having a sharp aviation snip becomes essential. Dremel Tools Sharpening Kits provide a convenient solution for achieving razor-sharp snip blades. Follow these steps for effective sharpening:
Materials you will need:
- Dremel rotary tool equipped with a compatible sharpening kit
- Screwdriver and wrench
- Safety glasses and gloves
- Helping partner for workbench or stability
- Inspect and clean:
Loosen the screw and nut before the snip’s cutting blade using a screwdriver and wrench. Check the blade for any damage. If minor, use a hand file for repair. If the problem is more severe, consider a replacement. Clean the blade and snips thoroughly, making sure they are free of any debris.
Step 1: Set Up the Sharpening Kit and Secure the Snips
Attach the sharpening kit to your Dremel rotary tool. Choose a medium-sized kit; it’s perfect for sharpening snips. Adjust the speed of the Dremel to a medium setting.
Because aviation snips have complex mechanisms due to their design, position them with the help of a workbench and a partner. Open the cutting blade and make sure it is properly aligned.
Step 2: Begin the Sharpening
Turn on the Dremel and slowly guide it along the cutting edge from start to finish, repeating the process several times.
Perform the same routine for the upper edge of the same blade. Put safety first with the help of a partner.
Step 3: Check Sharpness
To ensure its smoothness and shine, test it by twisting a worn-out cloth on your finger along the blade’s edge.
Conduct a test cut on a piece of sheet metal to confirm sharpening performance; if your aviation snip is not sharpening well, re-sharpen. But don’t over-smooth the sharp edge of it because it can break very easily.
Following these steps, you can use the Dremel Tools Sharpening Kit to achieve sharp aviation snips.
Method 3 – Grinder With Sanding Discs (Risky Methods)
It may seem daunting to venture into sharpening aviation snips using grinders and sanding discs, but don’t panic—I’m here to provide a comprehensive guide that will lead you to mastery.
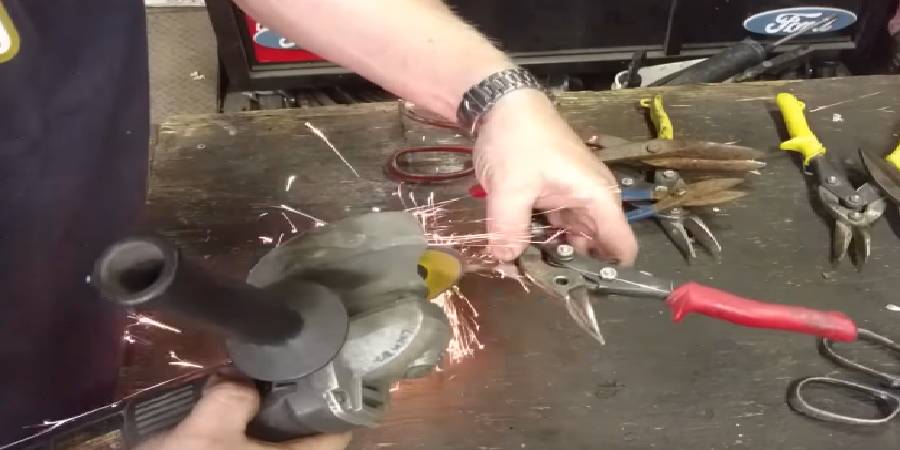
(Note: You should follow steps 1 and 2 of the earlier procedure to open the snip and repair and clean it.
Step 1: Setup and partner support:
Attach the sanding disc to your grinder. For extra support, enlist a partner to help. Have the snip held securely on a workbench so that both cutting arms are freely accessible.
Step 2: Grinding Techniques:
Start the grinder in motion, guiding it along the cutting length of the snip from start to finish. Repeat this action 2-3 times for best results. Bring it up with a sharp edge at a 25-degree angle, carefully moving the grinder steadily and slowly.
Step 3: Precise focus:
Maintain synchronization with your partner during the procedure to ensure safety. The operation of the grinder can create risks for both opposite each other. Prioritize effective sharpening at the starting point and follow up with the same precision on the other blade.
Step 4: Finishing Polish:
To measure your progress, gently glide the sharp end of the snip across a cloth held in the palm of your hand. A smooth texture and fine sheen indicate successful sharpening.
Familiarize yourself with your new sharp aviation snips. They now embody the confidence that comes with honed skills, primed for precise, effortless sheet metal work.
You should avoid sharpening aviation snips using a grinder with a sanding disc unless you are in great danger.
Wrong Ways to Sharpen Aviation Snips That People Try to Use
Attempting to sharpen the blades of aviation snips using a whetstone is misguided. The design of snips, featuring a short blade side, makes this method ineffective. Whetstones are optimized for large blades, making them unsuitable for precision snip blades. This effort wastes time and risks damaging the snips or yielding results.
How to Maintain It After Sharpening?
After sharpening, maintaining aviation snips involves wiping them clean, then applying a thin coat of oil to prevent rust. Store or hang them in a dry, protective case to avoid blade contact. When borrowing, communicate their specialized use for cutting metal sheets, wires, or plastics.
Return them clean and unharmed, as they excel in HVAC, roofing, and electrical work. Prioritize precision and avoid cutting materials beyond their capacity to ensure longevity and optimal performance.
FAQ’s
Is It Better to Over-sharpen Aviation Snips?
Gauging the sharpening of aviation snips requires finesse. Excessive sharpening renders blade edges fragile, imperiling robust cutting tasks. Delicate precision may be compromised, affecting intricate cuts.
Ensuring optimal sharpening involves vigilant observation: inspect the blade’s reflective edge; it should retain a subtle sparkle without appearing mirror-like. Run your fingertip gently along the edge, feeling for a slight burr – an indicator of proper sharpening.
How Often Should It Be Sharpened?
The frequency of sharpening aviation snips depends on their usage intensity. As a general guideline, consider sharpening them when you notice a decrease in cutting efficiency.
Regular maintenance can prevent the blades from becoming excessively dull, ensuring optimal performance. However, avoid over-sharpening, which can lead to blade damage.
How Do I Know if My Aviation Snips Need Sharpening?
Signs that your aviation snips need sharpening include:
1. Leaving rough edges on the workpiece.
2. Requiring more effort to cut through materials.
3. Bending the metal before cutting.
4. Feeling strain or fatigue in your hand after use.
Conclusion
Sharpening your plane snips is crucial for precise metal work. But prioritize safety, use the right tools, and maintain the angle for the best results. Also, if you have a different opinion about them, remember to comment below.